*notcot -
05.14.13
, 22:04 -
 Explorations in 3D printing + growing wearable = Xuedi Chen’s Invasive Growth! We’ve been curiously following along on instagram for some time now… and the project is now live! I love that it’s “…inspired by my fascination with cordyceps, a fungal parasite that attacks arthropods. Once infected, the fungus slowly takes control of the insect both mentally and physically. Before the insect dies, the fungus makes it climb high onto a branch and grip on, giving it an advantageous place to spread spores. Once the insect is dead, the cordyceps protrudes out, breaking through the exoskeleton.” And the final pieces play with moss growing on wearable neck/head pieces… imagine a day when you need to water your jewelry regularly? Take a peek at the process and details on the next page!
--> to more images
*notcot - , 19:15 -
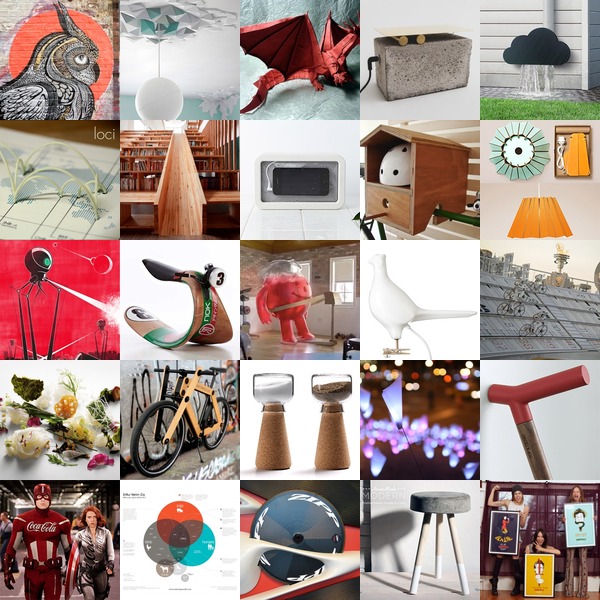
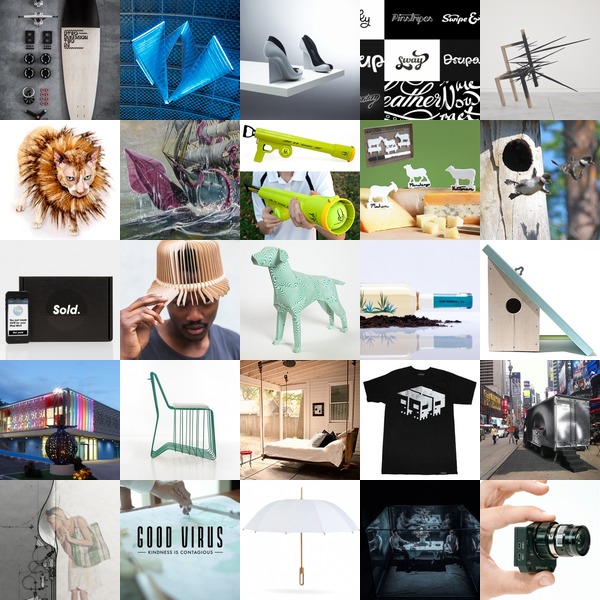
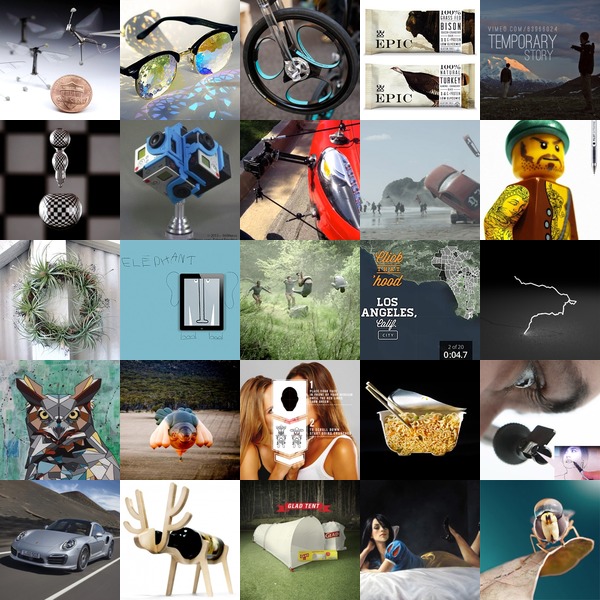 Another amazing inspiring week is behind us ~ from video projected in droplets, animal wine bottle creatures, food cut in half, the trash bag tent, how Drive shoots their amazing videos, apps you can draw AROUND, the neoLucida, lego tats, land rover parkour, EPIC meat bars, kaleidescopic glasses and far more… click the pics to find out more!
*notcot -
05.10.13
, 16:58 -
 Fun detail Shawn noticed when we were driving up Sunset Blvd in Hollywood… those street lamp banners were turned into guitar strings with a Jack Daniel’s Guitar Pick stuck in them! See more pics of it on the next page…
--> to more images
*notcot -
05.08.13
, 02:26 -
 This post is part of the NOTlabs Laser Challenge: Shawn and I are alternating days with executing and sharing a Laser Cutter involved experiment! And most importantly - we’re supposed to have fun, explore ideas, and it’s less about a fully formed product/concept at the end of the day, but more about seeing where the experiment takes us!
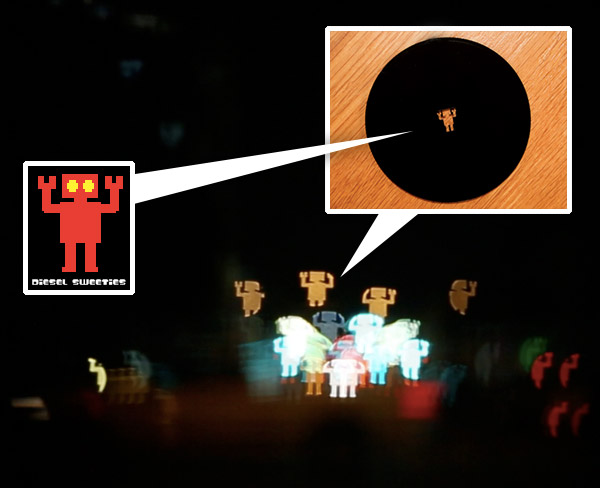
Laser Challenge #12 was inspired by Bokeh Shape Filter Kits which you can buy (but never fit my primary lens which has larger wide angle) and DIY versions. Bokeh means blurred in Japanese, and it’s used to describe the out of focused lights in your dark/night shots. By placing one of these filters on your lens (essentially a black disk with a shape cut out in the center) you can change the shape of those light blurs! There’s something fun about playing with a process so analog and instantaneous in a world where its so easy to photoshop everything… it’s almost magical to see what light shapes appear through the viewfinder.
And since i was chatting with Rich of Diesel Sweeties while testing out shape ideas… we were inspired to try one of his red robots! … as well as jumping sheep and a gear/burst! Ultimately, the robots were our favorite as we tested it out taking pictures in santa monica of the pier, pch traffic, the intersections and more! They also work fantastically for video… the mesmerizing robots that emerge from every light we drove by as they danced to the music makes it tempting to choreograph a music video light show or sorts, or a light driven stop motion animation… but perhaps that’s a project for another night? Check out our driving video experiments as well as some fun photo effects we discovered while playing with the Bokeh shapes on the next page!
p.s. If you have ideas, or want some laser cutting done, or want to play with us… feel free to use the contact form or leave a comment! And if you’re curious about the laser cutter we’re using, here’s the unboxing.
--> to more images
*notcot -
05.07.13
, 17:40 -
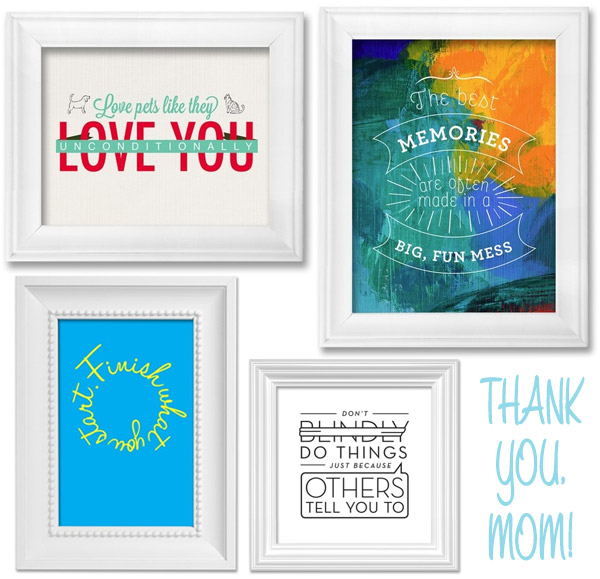 Fun way to celebrate the upcoming Mother’s Day, the artists over at Wieden & Kennedy are busy illustrating advice from moms for P&G’s Thank You, Mom. campaign and posting them up on their pinterest (there are 59 so far!)
To join in the fun ~ “What’s the best advice your mom gave you? Mothers give us the gift of wisdom through life lessons they pass down to their children. This Mother’s Day, P&G is honoring moms by creating a gallery of these beautiful bits of knowledge. Share yours using #momswisdom or on our Facebook page and it may be added to our gallery.” Fun idea, beautiful typography, and lots of sound (and some interesting) advice! Take a peek at some of my favorites so far on the next page…
--> to more images
*notcot -
04.30.13
, 16:11 -
 Phew* Sorry i’ve been quieter than usual over here ~ getting sick has sort of thrown a kink in regular posting and the Laser Challenge this weekend, but working through it all and trying to catch up before NY Design Week! Lots of fun inspiration again over at NOTCOT.org, so click the pics above to find out more!
*notcot -
04.24.13
, 01:40 -
 This post is part of the NOTlabs Laser Challenge: The ground rules are: Shawn and I are alternating days with executing and sharing a Laser Cutter involved experiment! And most importantly - we’re supposed to have fun, explore ideas, and it’s less about a fully formed product/concept at the end of the day, but more about seeing where the experiment takes us!
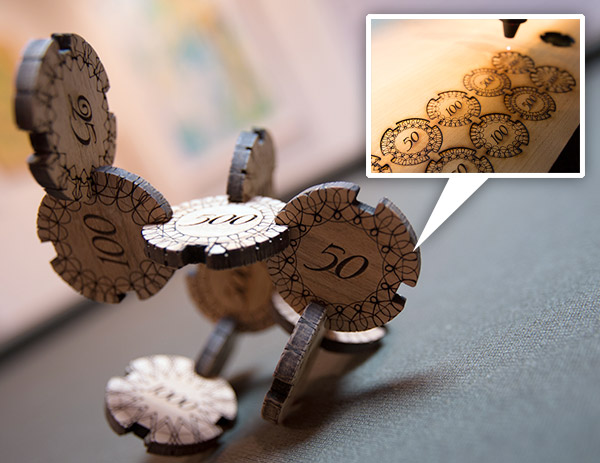
Laser Challenge #7 is here! When Shawn was teaching me to play poker this weekend, I found it hard to stop playing with the chips (and it was driving me crazy how ugly they were) ~ so naturally the conversation evolved to sparking ideas about how much more fun they could be! So for today’s challenge, he prototyped some gorgeous wooden poker chips that you can BUILD with! They interlock to make fun little structures during the game… we’re still fine tuning it more before we end up with a full set - perhaps the future ones with use different woods/materials for different values, or a splash of lacquered color along the edges, and have deeper notches to help them attach better, but it’s a fun start! See the making of and details on the next page!
p.s. If you have ideas, or want some laser cutting done, or want to play with us… feel free to use the contact form or leave a comment! And if you’re curious about the laser cutter we’re using, here’s the unboxing.
--> to more images
*rugenius -
04.23.13
, 00:00 -
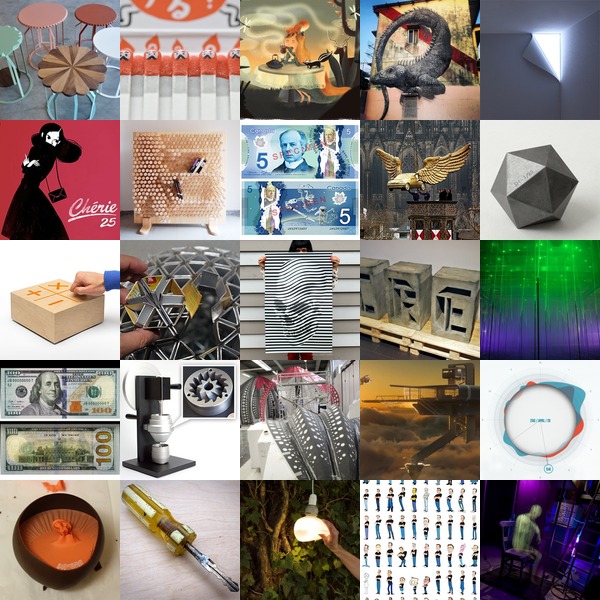
This week’s roundup from NOTCOT.org includes flat-packed custom bicycles, sponsored heroes, amazing origami and more. To find out more about each post, click on its individual image.
*notcot -
04.21.13
, 11:45 -
 This post is part of the NOTlabs Laser Challenge: The ground rules are: Shawn and I are alternating days with executing and sharing a Laser Cutter involved experiment! And most importantly - we’re supposed to have fun, explore ideas, and it’s less about a fully formed product/concept at the end of the day, but more about seeing where the experiment takes us!
Weekends are tougher - especially with guests! But it also means more people to help… or pose! So here’s my Laser Challenge #6 from last night - Vegetable Garden Guys! It’s that perfect time of year to get our vege garden going again, but i tend to forget what went where and it’s a surprise when it all pops up… so i rounded the guys up to pose against the white wall (as if holding massive vegetables) to turn them into wooden garden markers. Of course a few things went wrong for this speed project ~ it was a learning experience for us to see what built in settings for engraving from photographic images the laser cutter hard (total fail, learning about rasterizing/engraving on the side now) - then i decided to just print them out on paper to stick on to the guys - and printer started running out of ink. But the little guys are still pretty fun, and i’ll definitely be revisiting them for a round 2! Take a peek at fun on the next page ~ romanesco broccoli seeds started and cucumbers, bush beans, honeydew, and lettuce on the way!
p.s. If you have ideas, or want some laser cutting done, or want to play with us… feel free to use the contact form or leave a comment! And if you’re curious about the laser cutter we’re using, here’s the unboxing.
--> to more images
*notcot -
04.20.13
, 02:34 -
 This post is part of the NOTlabs Laser Challenge: The ground rules are: Shawn and I are alternating days with executing and sharing a Laser Cutter involved experiment! And most importantly - we’re supposed to have fun, explore ideas, and it’s less about a fully formed product/concept at the end of the day, but more about seeing where the experiment takes us!
Day 5 is here ~ and being an odd day, it’s Shawn’s turn! Tonight he created a playful cardboard building set made of two complex shapes which combined can create a variety of creations. Here’s what he has to say about it, “The geometry is of an icosahedron which consists of 20 triangular faces. Connectors are needed to attach each face to the next and if they are all oriented inwards you have the whole icosahedral shape. If you occasionally flip the connector angle you can make mini landscapes too. I cut 90 faces and a ton of connectors.” Take a peek at the making of and some of our creations on the next page!
p.s. If you have ideas, or want some laser cutting done, or want to play with us… feel free to use the contact form or leave a comment!
--> to more images
*notcot -
04.19.13
, 01:22 -
 This post is part of the NOTlabs Laser Challenge: The ground rules are: Shawn and I are alternating days with executing and sharing a Laser Cutter involved experiment! And most importantly - we’re supposed to have fun, explore ideas, and it’s less about a fully formed product/concept at the end of the day, but more about seeing where the experiment takes us!
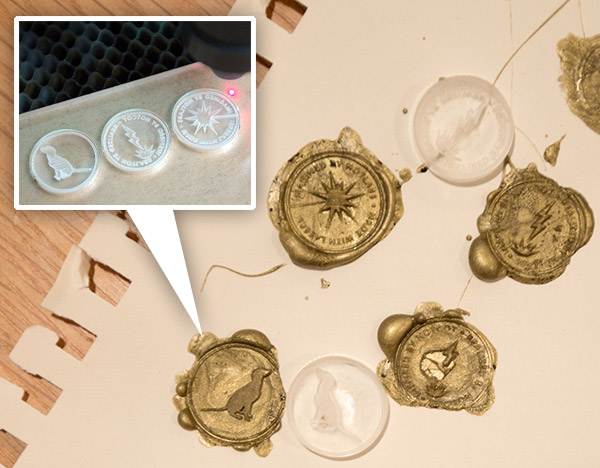
Day 4! My turn… for some reason, wax seals came up yesterday, and it’s one of those things i have always wanted, been meaning to design, but could never quite commit to what to put on it to have a proper brass one made. So, why not try engraving acrylic and seeing how it works as a wax seal? It was also a chance to explore the option of grade engrave, which is used for rubber stamps, etc so that things like the dot in a lower case i are more stable (and don’t break off in use) - basically it tapers the edge instead of being perfectly horizontal. Now i can leave a seal of “Imagined by NOTlabs. Made with lasers!” and “Inspired by NOTCOT. Realized by NOTlabs.” on things! To be honest, it worked better than i expected, but also needs a bit of refining… might have to experiment a bit more, and if i had more time, i have a feeling mounting the engraved discs on a handle would help quite a bit, also figuring out the right timing of how long to let the wax sit before pressing the seal in. But that being said, still got quite a few good examples, and will definitely be exploring it more… also such a fun way to seal things up… take a peek at the details and process on the next page!
p.s. If you have ideas, or want some laser cutting done, or want to play with us… feel free to use the contact form or leave a comment!
--> to more images
*notcot -
04.17.13
, 21:50 -
 This post is part of the NOTlabs Laser Challenge: The ground rules are: Shawn and I are alternating days with executing and sharing a Laser Cutter involved experiment! And most importantly - we’re supposed to have fun, explore ideas, and it’s less about a fully formed product/concept at the end of the day, but more about seeing where the experiment takes us!
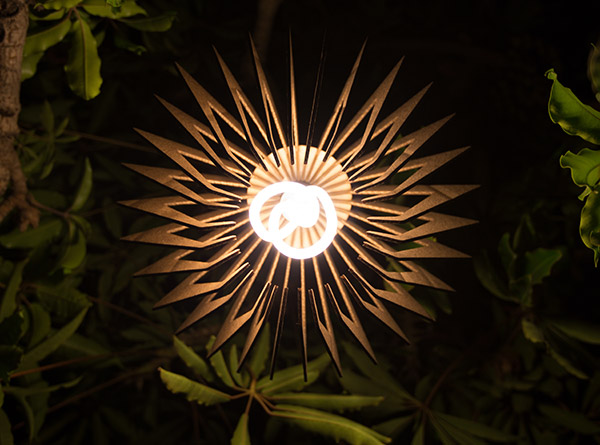
Day 3 ~ and Shawn is up. Part of the Laser Challenge is definitely timing, on a crazier day we’re still challenged to have fun and experiment with SOMETHING! So today’s was quite the speed project for him as he whipped up this laser cut wood/cardboard light this evening. So, here is the “Hook It Up” Light… lit with a plumen! Perhaps the most important thing we learned today was that with any speed challenge, there is the constant nagging “omg what if we add this… or change this… or do that?” and ultimately you just have to go with your gut instincts and move fast with what time is left. It was also far too fun hanging the light up in our trees for the photoshoot! Take a peek at the final light (and making of!) on the next page…
p.s. If you have ideas, or want some laser cutting done, or want to play with us… feel free to use the contact form or leave a comment!
--> to more images
*notcot -
04.16.13
, 20:20 -
 This post is part of the NOTlabs Laser Challenge: The ground rules are: Shawn and I are alternating days with executing and sharing a Laser Cutter involved experiment! And most importantly - we’re supposed to have fun, explore ideas, and it’s less about a fully formed product/concept at the end of the day, but more about seeing where the experiment takes us!
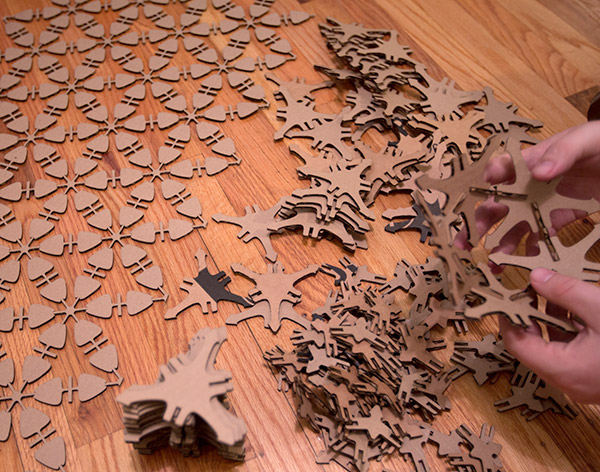
Day 2 of the NOTlabs Laser Challenge, and today it’s my turn! I’ve been obsessively researching tiles lately ~ from ancient patterns of the far east to the french/moroccan styles to modern geometrically inspired and asymmetrical designs, while simultaneously working on the garden and wondering why there aren’t nicer options for stepping stones, pathways, etc… so today, this lead me to experiment with hexagons and exploring designs and seeing what emerges! The result are a bunch of laser cut corrugated cardboard tiles ~ which could become fun concrete tiles to lay in the grass, or tiling street art, or spray painting using them as stencils… or… take a peek at the process and fun on the next page!
p.s. If you have ideas, or want some laser cutting done, or want to play with us… feel free to use the contact form or leave a comment!
--> to more images
*notcot - , 11:23 -
 A look back at the last week on NOTCOT.org! Click the pictures to find out more about each post…
*notcot -
04.15.13
, 22:24 -
 Our NOTlabs Laser Challenge #1 is here from Shawn! As for what the Laser Challenge is - the ground rules are: Shawn and I are alternating days with executing and sharing a Laser Cutter involved experiment! And most importantly - we’re supposed to have fun, explore ideas, and it’s less about a fully formed product/concept at the end of the day, but more about seeing where the experiment takes us!
So first up, here’s Shawn’s Puppy Platter… which, honestly, didn’t have this function in mind until his experiment with heating and pressing some of our plastic scraps ended up with a fun sheet filled with various mini bowl like spaces… He initially thought about planting succulents in them, but we quickly realized this would be better served if we made a much larger version. And with Bucky’s feeding time nearing, we decided to try it out as a modern Puppy Platter/Bento Box of sorts! (Don’t worry, we won’t be feeding Bucky from this regularly - the photos are a quick photoshoot test!) It is fascinating to see which of his treats and food choices he picked and in which order… also great, it slows him down as he carefully inspected and sniffed each section before devouring it! (Versus scarfing it down without much thought!)
As for where the laser cutting is involved… take a peek at the process pics on the next page… laser cutting was used to create the frame around the plastic sheet as it was being pressed. Check out Bucky trying out this modern Puppy Platter on the next page!
p.s. If you have ideas, or want some laser cutting done, or want to play with us… feel free to use the contact form or leave a comment!
--> to more images